How to Format an SSD in Windows 10 and 11
Formatting an SSD (Solid-state Drive) can have multiple meanings depending on how the word “format” is being used. Traditionally, formatting or reformatting only deletes the file system on the drive and all other data remains intact, whereas wiping deletes all data off the drive. However, the terms formatting and wiping are often used interchangeably. In this guide, we’ll explore how to format an SSD in Windows 10 and 11 and how to completely wipe an SSD from your system’s BIOS.
How to format an SSD in Disk Management
The process to format a solid state drive is relatively simple, but before you begin the process, you’ll first need to confirm a few things:
- Make sure you are logged into an administrator account. You will not be able to format an SSD from a standard user account.
- Ensure that any and all data you want to keep is backed up. Once the drive has been formatted, it can be difficult to recover any of the data. However, this data can still be recovered through proper means. If you’re storing sensitive and/or private information on the drive that you want to permanently erase, you’ll want to use a secure erase method to wipe the data on the SSD. This will ensure that there are no traces of your data on the drive (more on that below).
To format an SSD from Disk Management:
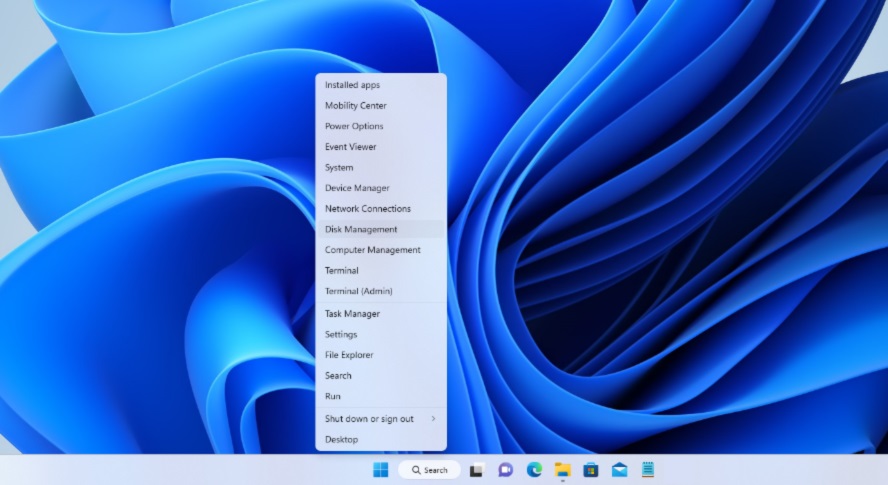
1. Right click on the Windows Start button. Choose Disk Management.
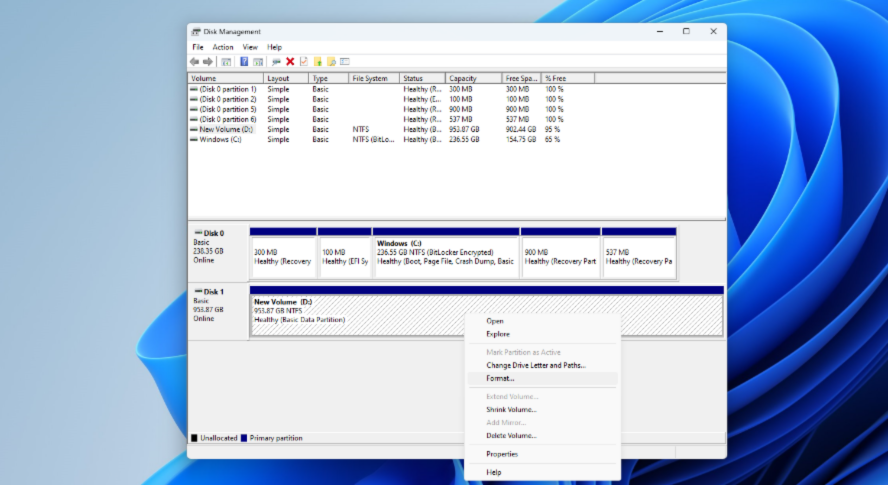
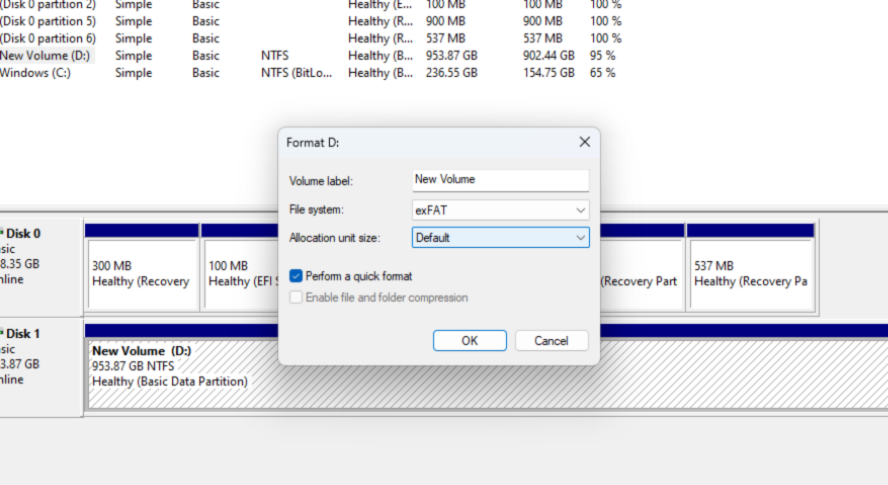
2. Right click on the partition you want formatted. Select Format under the drop-down menu. If you want the entire drive to be formatted, right click each partition first and delete them.
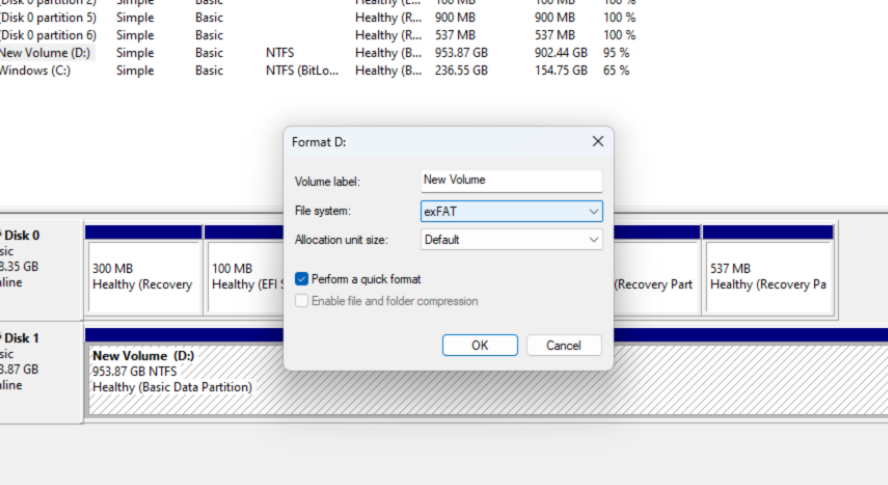
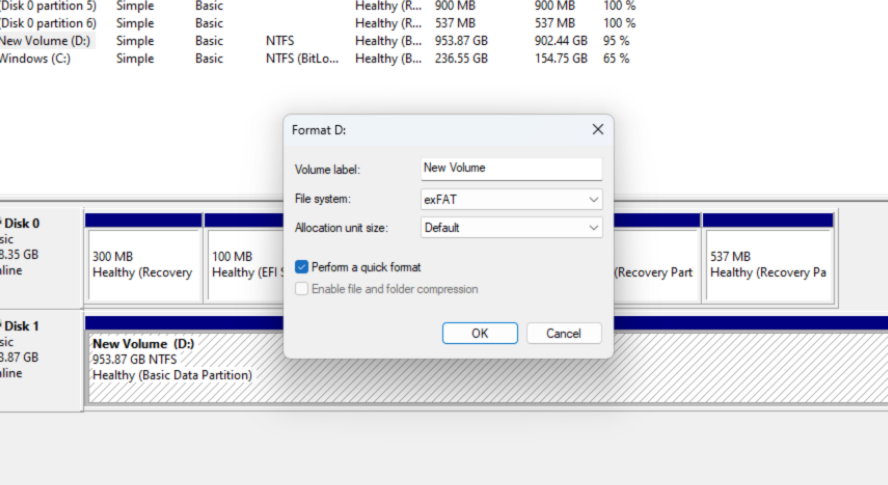
3. Choose a format under the File system dropdown menu.
a. NTFS is best suited for using a drive with Windows devices. Choose this format if you’re going to use the drive with a Windows computer.
b. exFAT is best suited for using a drive with both Windows and Mac OS devices. Choose this format if you’re going to use the drive between computers with different operating systems.
c. FAT is for small drives (4GB or fewer) and is no longer commonly used except in rare cases. Choose this format if instructed to by a device manual, such as a 3D printer manual.
4. Select your preferred Allocation unit size under the dropdown menu, or leave it set to the default. For most users, leaving it set to default (4096 bytes) is the best option.
5. Check Perform a quick format*.
*Unchecking this will result in the system scanning the drive for bad sectors which will add on a few minutes to the formatting procedure. If you think your drive may have corrupted some of your data, it is recommended to uncheck this option so the drive can scan for bad sectors and no longer store data within them.
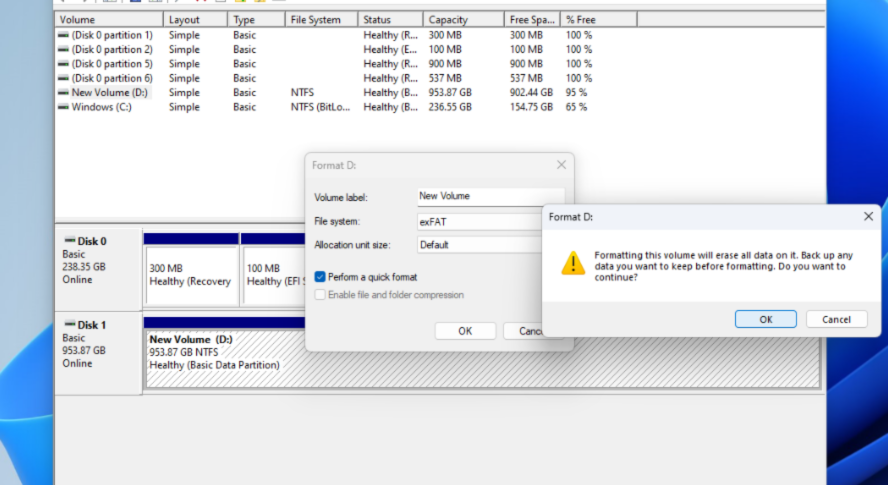
6. Click OK, and click OK again when prompted.
Can you format an SSD from BIOS?
The word “format” is often used to mean both formatting and erasing, but technically, only using a secure erase method will erase the data. Some motherboard manufacturers offer a secure erase method from within the motherboard’s BIOS. You will need to consult your motherboard’s documentation to see if your motherboard has secure erase capability. Alternatively, you can use an available software to securely erase an SSD from within Windows.
Before attempting to securely erase from BIOS, it is important to note that this feature is not standard and isn’t available on all motherboards. If you are unable to secure erase your SSD from BIOS, you can do this through your SSD management software. The steps listed below will also vary by computer.
To securely erase an SSD from the system BIOS, you will first need to shutdown your computer. After the shutdown, follow these steps:
- Enter the system BIOS. You can do this by repeatedly pressing the BIOS key. This key will vary by manufacturer, but some of the most common BIOS keys include the delete, F1, F2, F10, and F12 buttons. Mention of the correct key will usually appear on the lower quarter of the screen in either the left, center, or right quadrant when the system boots.
- Click on the Security tab.
- Select Hard Drive Utilities. Some systems may also have this listed as Hard Drive Tools.
- Select Secure Erase.
- Click on the drive you want to clear.
- Wait for the prompt, and click Continue.
When to format or secure erase an SSD
Not all SSDs need to be formatted, and securely erasing an SSD is needed in even fewer cases. Usually, you will need to format an SSD after purchase in order to ensure it’s compatible with your operating system or if you are moving the SSD from one device to another.
Completely wiping an SSD through a secure erase method is typically only needed when you expect someone may use or try to access the private information on an SSD you’re no longer actively using.
Have any questions?
Let the experts at OnLogic help with any support you need. For any additional help you need with formatting your SSD, contact our expert technical support team today. You can also check out our line of SSDs, and for a deeper dive into SSD vs HDD, watch our Tech Edge video below.
Get the Latest Tech Updates
Subscribe to our newsletters to get updates from OnLogic delivered straight to your inbox. News and insights from our team of experts are just a click away. Hit the button to head to our subscription page.
Share
More Articles
OnLogic Industrial Computers
Discover OnLogic's multitude of industrial computers that will help you to advance your IoT project
Learn more at OnLogic.com
OnLogic Industrial PCs: Designed to last. Built to order. Delivered in days. Visit our online store at OnLogic.com

