Karbon K300 and K700 series computers have an internal microcontroller (MCU) that manages features like DIO, CAN, Ignition sensing, and more. This microcontroller can be managed by sending commands to two virtual serial ports from the operating system.
This article will outline several methods for interfacing with the system’s MCU. It also provides a complete list of the exact command strings supported by the microcontroller.
Note: We recommend making sure your microcontroller firmware is up to date before trying any of the below.
Method 1 – Karbon Command Line Utility
The Karbon command line utility is a straightforward method for managing all core microcontroller functionality. You can download the utility for Windows or Linux systems here, and use it to communicate directly with the onboard MCU.
| Windows | Linux |
> karbon.exe op version | $ sudo ./karbon op version |
Complete instructions on using the utility are included as part of the download package. This utility may also be used to update the microcontroller’s firmware version.
Method 2 – Pykarbon
What is the Pykarbon Module?
The Pykarbon module provides a set of tools for interfacing with the hardware devices on OnLogic’s ‘Karbon’ series industrial PCs. These interfaces include the onboard CAN bus, Digital IO, and other hardware devices.
The goal of the Pykarbon package is to provide a simple, powerful base platform that will allow users to quickly and easily integrate a Karbon into their own application.
The tools in the Pykarbon package are designed to work with the Karbon series rugged industrial computers; this will not work for more generalized systems.
What can the Pykarbon Module do?
Pykarbon offers a number of tools for automating and using Karbon series hardware interfaces. These include:
- CAN and DIO background data monitoring
- Exporting logged data to .csv
- Registering and making functions calls based on these bus events:
- CAN data IDs
- Digital Input Events
- DIO Bus States
- Automated CAN message response to registered IDs
- Automated setting of Digital Output states
- Automatic CAN baudrate detection
- Updating user configuration information:
- Ignition sense enable/disable
- Power timing configurations
- Low battery shutdown voltage
- Etc.
- Firmware update
Setting Up the Pykarbon Module
You will need to install Python 3 prior to following this guide.
To get started with Pykarbon, follow these steps:
- Open up a terminal and run:
- Launch a python shell with:
- In the python shell, import pykarbon with:
- And finally create a control object using:
- If all went well, you should now be ready to control a variety of systems, but for now let’s just print out some configuration information:
- And close our session:
pip install pykarbon
python
import pykarbon.pykarbon as pk
dev = pk.Karbon()
dev.show_info()
dev.close()
After the initial setup, visit our Pykarbon Github page to begin using the Pykarbon module for your Karbon series rugged PC.
Method 3 – Serial Interface
Connecting from Windows
- Download and install the latest version of the PuTTY tool. Download Link
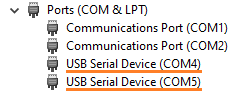
- Open device manager and look for the USB serial devices.
- Note their COM numbers, typically 4 and 5.
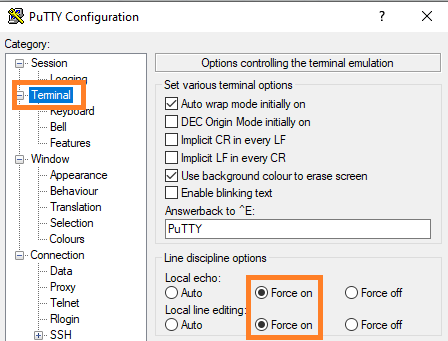
- Open PuTTY and configure these options
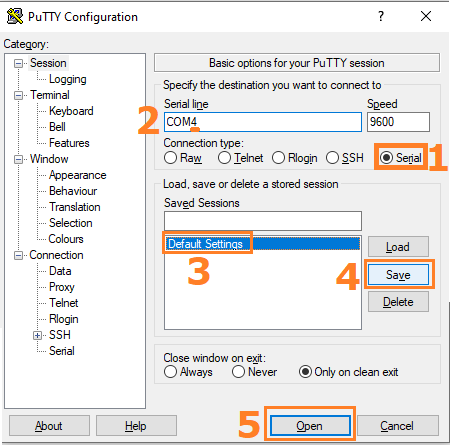
- Select the serial option
- Change the COM number to match device manager, typically COM4
- Click on default settings
- Click Save
- Click open
This configures PuTTY to automatically choose the correct options next time you run it.
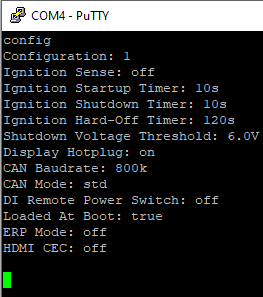
- Type config and press enter. The terminal should respond by printing out the current configuration. You may then enter commands from the next section.
- If config does not work, try using the other COM port number from device manager.
Connecting from Ubuntu Linux

- Install PuTTY
Note: If installing from a live CD, you will need to enable the multiverse/universe repositories

- Run PuTTY as root
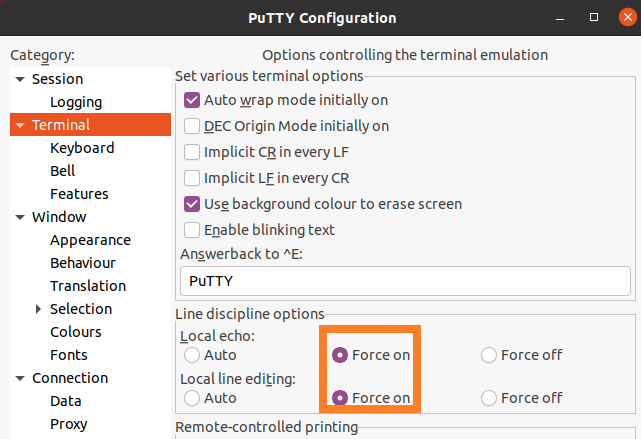
- Set the options shown
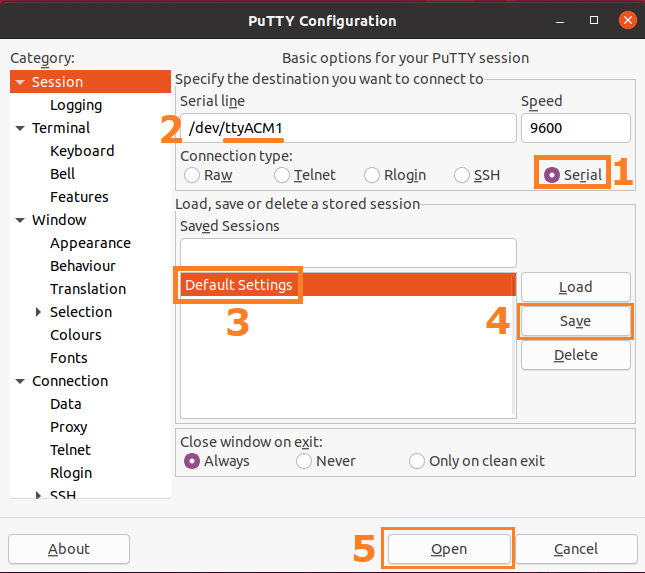
- Select the serial option
- Change the COM device to ttyACM1
- Click on default settings
- Click Save
- Click open
This configures PuTTY to automatically choose the correct options next time you run it.
- Type config and press enter. The terminal should respond by printing out the current configuration. You may then enter commands from the next section.
- If config does not work, try using other com ports from /dev
Serial Commands
Serial Commands – System Information
The serial terminal can report various system information to the host. This covers firmware version and build date, alongside physical and electrical status information. For instance, the K700 can report the current system input voltage, internal temperature, and internal humidity.
The available information is system dependent, and is not unified across all Karbon systems.
Commands for reporting this information include:
versionDescription:Reports the firmware version number and build date. Uses the format: < version | date >Parameters:-Example:version
statusDescription:Reports the firmware version number and system dependent status information.Parameters:-Example:status
get-voltageDescription:Reports the current system input voltage. This command is currently only available on the K700.Parameters:-Example:get-voltage
Serial Commands – System Configuration
The Karbon series has several configuration options that effect system behavior. These primarily include automotive features, like ignition sensing and battery drain protection.
The system can store up to four different configurations, one of which will be loaded as default when the system is first powered on. This allows for temporarily disabling automotive features, like low voltage shutdown. The active configuration may be cycled by pressing the settings switch.
The available commands for controlling system configurations include:
configDescription:Reports the current microcontroller configuration settings.Parameters:-Example:config
save-configDescription:Saves any changes made. This is a required step or any changes will revert after reboot.
user-config [config-number]Description:Sets the currently active user configuration.Parameters:config-number -->The configuration number: 1 - 4Example:user-config 2
Several configuration parameters may also be set. They include:
set ignition-sense [enable]Description:Enables or disables ignition sensing. The system will turn on when the ignition pin goes high, and power off if the pin falls for more than the specified shutdown-timer. This is achieved by emulating a front power button press, and can be interrupt by the OS. Therefore, after the hard-off timer has expired, the system will force a power down.Parameters:enable -->Enable or disable: 'on' or 'off'Example:set ignition-sense off
set startup-timer [time]Description:Sets the delay before the system powers on after detecting ignition.Parameters:time -->Time delay in seconds: 0 - 9999 (s)Example:set startup-timer 15
set shutdown-voltage [volts]Description:Designed to protect automotive systems from battery drain, the system will turn off the input voltage drops below this level for more than the specified shutdown-timer. This is achieved by emulating a front power button press, and can be interrupt by the OS. Therefore, after the hard-off timer has expired, the system will force a power down. Setting this voltage to a value of '6' or less disables the feature.Parameters:volts -->The low voltage shutdown level: 0 - Max System Voltage (V) On the K700 this value may be a float (12.5, 19.2) but is required to be an int (12, 19) on the K300. Floating point shutdown voltages will be added to the K300 as part of a future firmware update.Example:set shutdown-voltage 12
set hotplug [enable]Description:Enables or disables display port hotplug detection. Disabling hotplug detection will keep displays from re-arranging if a monitor goes down. When disabled, the host will assume that all displays are always connected.Parameters:enable -->Enable or disable: 'on' or 'off'Example:set hotplug on
set shutdown-timer [time]Description:Sets the delay before the system powers off after ignition falls or the system voltage drops below the safe level.Parameters:time -->Time delay in seconds: 0 - 9999 (s)Example:set shutdown-timer 20
set hard-off-timer [time]Description:Sets the delay until the system forces a power off after ignition falls or the system voltage drops below a safe level.Parameters:time -->Time delay in seconds: 0 - 9999 (s)Example:set hard-off-timer 150
set boot-config [true | false]Description:Determines which user configuration is loaded when the system is first connected to AC power. Only one configuration may have this value set as true. By default, user configuration one is loaded at boot.Parameters:true | false:If the config is loaded at boot: 'true' or 'false'Example:set boot-config true
set low-power-mode [on | off]Description:Enable or disable entering low power mode (ERP mode), after the system has been shutdown. On K700 systems, when both this feature andignition-senseare enabled, the system will enter a 'very low power mode' and will only wake via ignition events.Parameters:on | off:If the system will enter low power mode: 'on' or 'off'Example:set low-power-mode on
Serial Interface Technical Details – Connection Specs
- Baudrate
- Recommended baud rate: 9600
- Note: Because the Karbon series operates using a virtual serial port, it is able to support a broad range of baud rates. It is not required to operate the serial interface at the recommended rate.
- Flow Control
- XON/XOFF
- Command Format
- Commands are expected to be sent by line instead of by character, such that each command requires a single transaction. Line terminating characters will be ignored. The system is not sensitive to CRLF vs LF termination.
- Received Data Format
- Each line of returned data will be “/n/r” terminated
Commands sent to the Karbon computer should be in all lower case, and transmitted to the Serial Terminal port in a single transaction. Commands are not sensitive to line termination.
An error response will be sent if an unsupported command is sent or if the command is transmitted with the wrong number of accompanying arguments.
Serial Commands – CAN Bus
Some CAN configuration settings, alongside limited CAN messaging are supported through the Karbon Serial Interface. Sending complex messages, and receiving data, is handled by the dedicated CAN virtual serial port. More information is available in the CAN Bus FAQ.
Note: The CAN device is not internally terminated; a properly terminated cable or bus is required for correct CAN operation.
The commands available through the serial terminal include:
can-message [id] [data]Description:Formats and sends a standard can data frame.Parameters:id -->The message id. A three character hex string (1 - 7FF)data -->Data to transmit: A sixteen character hex string.Example:can-message 123 1122334455667788
can-autobaudDescription:Attempts to detect the baudrate and propagation delay of the bus. This is achieved by sending messages with the id 7FF, and may not work in every possible configuration. To maintain a detected baudrate across hard power cycles, please see the 'save-config' terminal command.Parameters:-Example:can-autobaud
set can-baudrate [baud]Description:Sets the baudrate for CAN bus communication. To maintain a set baudrate across hard power cycles, please see the 'save-config' terminal command.Parameters:baud -->The system baudrate, in thousands: 100 - 1000 (k)Example:set can-baudrate 1000
Serial Commands – Digital IO
Controlling the Karbon Digital IO (DIO) is handled entirely through the serial terminal interface. The DIO state may be read, and output states may be set. Additionally, when an input changes state, that event will be passed to the serial terminal.
More information is available in the DIO FAQ.
Note: The digital io is isolated, and requires external power for proper operation. The system manual has additional information on these electrical characteristics.
The commands available through the serial terminal interface include:
dio-stateDescription:Reports the current logical states of the digital inputs/outputs. This is represented by eight characters, each a '1' or '0'. The bit order is: I0 - I1 - I2 - I3 - O0 - O1 - O2 - O3 Where 'I' is a digital input and 'O' is a digital output. For example: 10010110Parameters:-Example:dio-state
set-do [value]Description:Sets the output state of the four digital outputs.Parameters:value -->A four character string of '1', '-' or '0'. A '1' or '0' will set the output to the corresponding state, while a '-' will not change the sate of the matching output pin.Example:set-do 0--1
set dio-power-switch [enable]Description:When enabled, any of the front digital inputs can be used to power the system on. Once the system is powered on, they will behave as a typical digital input.Parameters:enable -->Enable or disable: 'on' or 'off'Example:set dio-power-switch on